What is Git and Github?
Git, launched in 2005, is a complimentary, distributed version control system that facilitates collaborative work on software projects, irrespective of the geographical location of the contributors. It offers the ability for multiple developers to independently integrate their modifications to the project, log and trace these alterations, and, when necessary, access previous versions of the project. Being platform-independent, Git can be utilised across diverse computing environments.
Contrastingly, GitHub enhances the collaboration process in Git. It serves as a platform that hosts code repositories in a cloud-based environment, thus enabling multiple developers to collaboratively engage with a single project and monitor each other’s modifications in real time.
Furthermore, GitHub encompasses features for project organization and management. For instance, tasks can be assigned to specific individuals or groups, and permissions and roles can be established for collaborators. Comment moderation is also available to keep all participants informed of the latest developments. Additionally, GitHub repositories are publically accessible, encouraging global interaction among developers. This allows for collective refinement of code, as developers worldwide can contribute to each other’s work with modifications and enhancements.
For research, the Docs of Github or the Docs of Git can be used. For the workflow, an initial exposure to Git is extremely helpful, allowing the work processes to be understood concretely. are understood.
Hint: Currently, this repository refers to working with Git on a local level only. More and working with remote repositories will follow.
Contents
Install Git
Git for Linux
Execute the following command in the terminal:
sudo apt-get install gitGit for Windows
-
Download Git for Windows from here.
-
Run the installer and follow the wizard steps.
Git for MacOS
-
Download Git for Windows from here.
-
Run the installer and follow the wizard steps.
Git - Local configuration
Installation instructions for the respective operating system can be readily obtained from Google. One of the first steps in using Git in conjunction with Gibhub is to configure Git on your own computer.
Inside the terminal:
git config --global user.name "Pseudonym/Name"
git config --global user.mail "Mailadress"
Furthermore, extremely complex configurations are possible.
Create a new repository
The initialisation command of Git is necessary for this:
git initGit then creates a new repository directory in the current directory. All files required by Git are stored in the subfolder /.git. In UNIX systems, the dot in front of the folder name indicates that this directory is hidden.
Git stores the corresponding versions of the programme we are working on in .git so that we can subsequently track how we have changed our programme.
Example: I want to create a repository called program.
I create a directory called program.
mkdir /home/user/programI then change to the appropriate directory and create the appropriate repository using Git’s initialisation command:
cd /home/user/programgit initIf you change to the appropriate /.git directory and run the ls command, you will get the following output:
branches  config  description  HEAD

hooks  info  objects  refs
The folder /.git contains various subfolders, which we won’t be doing much with at the moment, as Git automatically manages all versions.
Working with git
The following will be about understanding how the different versions are managed within a project and what nutritional value git offers for one’s own workflow. Many IDEAs facilitate working with Git in connection with Github. However, it is also necessary here to understand what is actually used how and above all why within the IDEA. Here, everyone is free to do version management relatively automatically or manually.
In the following, we will first introduce version management with Git. It should be noted that we will work exclusively locally. This means that all changes and subsequent work will be done exclusively on our own computer and nothing will be put online.
git add - Bridge between working directory and staging area
With a commit, the state of a project is saved at the corresponding time where the command was listed. Here, a commit corresponds to a version of the project, so to speak.
It is important to understand here that with a commit, the state of a project or a specific file in our working directory is transferred from the project to the so-called staging area. A commit is first prepared in the staging area with the following command:
For single file:
git add [FILE]For entire folders:
git add [FOLDER]After we have marked the corresponding files/folders with the command in the staging area, we could execute a commit directly. First, however, an important note:
Assuming we would continue to write our programme in our working directory after committing to the staging area, the changes we have made would not be adopted by the version stored in the staging area. For this, we would have to execute the git add command again.
Here it can be helpful to imagine several working levels:
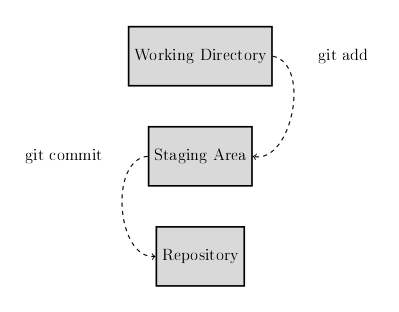
git commit - Bridge between staging area and repository
Since we have stored the current version of our programme in the staging area, we should switch to storing the current version in our repository from our staging area. This can be done by using the following command in the terminal:
git commit -m "message"This command creates a new commit from all the staged changes. When committing, it is necessary to store a commit message. For a better overview, it is helpful to store in the commit message what was specifically changed. Short and concise is the appropriate home remedy for the first line. This is followed by an empty line and then a small, more concrete description.
For this purpose, the parameter -m is used in connection with the message in the inverted commas. If a commit was carried out, a concrete commit ID is attributed to this commit. This is important when it comes to the work history of the repository.
It is worth noting that one atomic change per commit should be used to maintain the clarity of the repository.
Here are two examples:
- One commit per bug
- One commit per feature
If the commit command was used without the -m parameter, Git will prompt you to put a message in a text file. If this doesn’t happen, for example because you don’t leave a message, the commit command will be aborted.
Tip: If a programming project is growing and other programmers from all over the world may be working on your project, it would be advisable to leave all commit messages in English.
Good practice for commit messages
Short and concise: The first line of the commit should be a brief summary of the changes. It is often recommended
that this line should not exceed 50 characters.
Imperative form: Commit messages should be written in the imperative form, for example “Fix bug” instead of
“Fixed bug” or “Fixes bug”. This convention is followed by Git itself in its automatically generated messages, such
as “Merge pull request #123 from branch”.
Detail in body: If the changes require more context or explanation, these should be written in the body of the commit.
This should follow the summary line and after a blank line. It is often recommended that each line in the body should
contain no more than 72 characters.
What and Why: It can be helpful to describe not only what has been changed, but also the reason for the change.
This can be particularly useful when fixing bugs or making complex changes.
Reference resources: If your change references an issue or bug report, you should reference it in your commit message.
Some teams use certain conventions for this, such as adding “Fixes #123” to the end of the commit message to
close the issue, which is listed as number 123 in their issue tracking system.
The following parameter is useful if you have committed something and later find out that what you committed doesn’t really work. Then the original commit gets a new commit ID. This way, you don’t have to do another commit.
To change a commit, use the following command in the terminal:
git commit --amendThis will ensure that the latest changes from your working directory are included in the staging area.
Important: This rewrites the log from the repository. More precisely, the last commit is overwritten. Ideally, you should only use this command locally on your computer.
This becomes important when several people are working on a repository. Confusion can arise because not all people working on the repository have the same version on their computer.
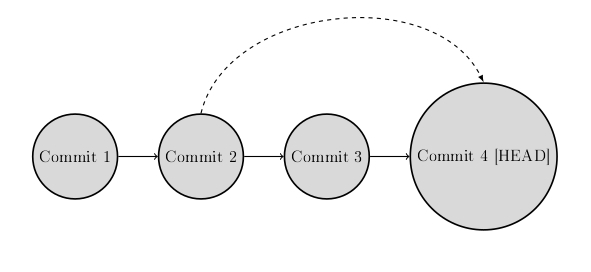
git log - History of the commits
This command allows you to display the individual changes to your repository. An individual commit is clearly identified by its SHA I hash. These hashes are created on the basis of the corresponding commit so that no two commits can have the same checksums.
To do this, use the following command in the terminal:
git logThe order of the commit history is such that the oldest change is shown at the bottom and the most recent at the top. You are shown the individual commits, including the corresponding checksums, author’s name, time and, last but not least, your commit message. It is important to note here that the most recent commit is referred to as HEAD.
Example:
commit 0fc55f28f09d4590c20422608bb58e7c8c3c307f (HEAD -> master, origin/master, origin/HEAD)
Author: jbloggs <jane.bloggs@protonmail.com>
Date:   Tue Jul 13 16:33:54 2021 +0200

Changes

commit 0d3407f361bfa326848843f89f65677b668f89e8
Author: jbloggs <jane.bloggs@protonmail.com
Date:   Tue Jul 13 16:28:53 2021 +0200

Changes

commit f759673ab7192fc2c22e7a2af723ea7f0b2adccf
Author: jbloggs <jane.bloggs@protonmail.com>
Date:   Tue Jul 13 16:25:23 2021 +0200

Changes

commit f3a0ab4bd479ebd110e6a13e62462857143050c5
Author: jbloggs <jane.bloggs@protonmail.com>
Date:   Tue Jul 13 15:28:19 2021 +0200
If we look at the history of the repository, we see a history with different hash values. The last commit is referred to here as HEAD. HEAD here means the most recent commit checked out.
Example:
0fc55f2 (HEAD -> master, origin/master, origin/HEAD) Changes
0d3407f Changes
f759623 Changes
f3a0db4 Changes
82b182b Update README.md
d02ccb6 Add files via upload
0df2ffe Create README.md
32e5dca Initial commit
We see here a series of commits with corresponding abbreviations of the hash values and the HEAD commit. If we look at the commits from top to bottom, the second commit (calculated from HEAD) is correspondingly the second to last commit. This can be identified not only with its checksum, but also as HEAD~1. This is the parent of the HEAD commit. The third commit is then HEAD~2, the fourth commit is HEAD~3, etc.
These names can also be used instead of the hash values of the individual commits. This makes it a little more convenient to work with.
Example:
git diff f759623 HEADor
git diff HEAD~1 HEADAnother important parameter for the command is -p. This displays significantly more information for the commits, such as which lines within the code specifically added or removed. If the commit needs to be displayed in less detail, the following parameter can be used:
git log --onelineExample:
0fc55f2 (HEAD -> master, origin/master, origin/HEAD) Changes
0d3407f Changes
f759623 Changes
f3a0db4 Changes
82b182b Update README.md
d02ccb6 Add files via upload
0df2ffe Create README.md
32e5dca Initial commit
For more information on the parameters use:
git log -h
git log --helpgit diff - Show differences
This command is useful if you are working within your working directory, but you are not sure which changes have already been applied to your staging area. With the following command, you can see the relative changes between the working directory and the staging area:
git diffTo see the relative changes between the staging area and the repository, use the –cached parameter.
Example:
git diff --cachedIf you want to see specific differences between two individual commits, you need the commit IDs of the two commits and the following command:
git diff [hash1] [hash2]Example:
git diff 0d3407f f3a0db4git diff 0d3407f f3a0db4
diff --git a/Program/program.py b/Program/program.py
index 12b063f..4a669d8 100755
--- a/Program/program.py
+++ b/Program/program.py
@@ -1,7 +1,5 @@
#!/usr/bin/env python
The variables a and b in front of the individual versions do not refer to concrete folders or directories, but to the corresponding versions that we put into relation.
The following output:
@@ -1,7 +1,5 @@means that in the first file the first line has been deleted and a total of seven lines are output, therefore -1.7. Subsequently, with the second file, one is added to the first line and a total of five lines are output, therefore +1.5
Important: If the command git diff –cached does not produce any output, it is probably because no concrete changes were made in the staging area.
It is quite possible that the comparison will show you changes that may not be correct. This is probably because git assumes what changes need to be made to get from hash1 to hash2. Therefore, it is important to store the hash values from old to young.
Note: Whoever commits first should also be named first.
In the simple case that we look at the changes of commits in relation to a single file, then it becomes quite clear. However, it is often the case that within a project there are several files that are changed within one commit. Then, of course, you will see a lot of changes. In order to be able to differentiate this somewhat, use the following important parameter to view the changes of a specific file:
git diff [hash1] [hash2] -- [dataname]Example:
git diff 0d3407f f3a0db4 -- program.pyNote: The – [dataname] parameter can be used with all the git commands presented, such as git log. It is also possible to view changes to specific file formats or filenames. A proxy can be used for this.
Example:
git log -- *.pyor
git log -- program.*Git reset - revert changes
Here we can remove all changes from the staging-area. The prerequisite for this command is that changes are stored in the staging area at all.For this we use the following command:
git resetIf it is a question of removing specific changes, such as from a specific file, then the following command can be used in conjunction with the corresponding file parameter in the terminal:
git reset [filename]But not only all changes marked for a commit can be undone, but also changes that refer specifically to a commit. The following command is responsible for this:
git reset [commit hash]Here, all changes in the workind directory remain, but all commits after the commit with the specified commit hash are deleted. This means that all changes that have already been committed to the repository with the corresponding commits are returned to the working directory after the above command.

Another important parameter, but one that should be used with caution, is the –hard parameter. Here, all commits are also deleted after the corresponding commit hash. The difference to the previous command is that all changes are discarded. To do this, use the following command in the terminal:
git reset --hard [commit hash]Important: When working with the git reset command, you must be careful, because this command can cause significant data loss. Do not use this command when working with remote repositories, such as Github. These repositories are often shared with other people and this command automatically changes the git history. If in doubt, always tend to not use the command.
The parameter –hard can also be used in other ways. Assuming there are correct changes in your repository and you want to continue working on your programme based on this current repository. If you are working in your working directory and unfortunately find that your changes have led you astray, you can use the following command to overwrite your current working directory with the current repository (MASTER):
git reset --hardBut here too, make sure you know what data is in your working directory before you execute the command. This can lead to immense data loss.
Git checkout - Jump to a commit
The git checkout command restores the state of a given commit. Then the current working directory is in the state it was in at the specified commit hash. You can view files, compile the project, run tests and even edit files without fear of losing the current project state. None of your actions and changes are saved in the repository.
Type the following command in the terminal:
git checkout [hash]Important: Git tries to make local changes here, which can lead to conflicts. Only use this command if your working directory is empty or has no changes.
With the git checkout command, we can check out a previous commit and return the repository to the status. Checking out a particular commit puts the repository into a state with the HEAD detached. In the detached state, all newly made commits are orphaned as soon as you return to an established branch. Orphaned commits are deleted by Git during the next purge. The purge occurs at configured intervals and removes orphaned commits permanently. To prevent orphaned commits from falling victim to garbage collection, we need to make sure that we are in a branch.
Once you have finished working on a particular commit, you can jump back to the original version of your project with the following command:
git checkout masterGit stash - cache changes
In case you want to see the status of your project from a few weeks ago, but you still have changes in your current working directory and/or staging area, you can use the command to display the status from that point in time without losing the current changes. You can use the following command to cache your current changes:
git stashIn short, git stash allows you to cache the current changes in your working directory and staging area.
Workflow example:
- You save the current state in the stash.
- Look at the past commit.
- Switch back to the current state.
- Read the old state from the stash.
Output:
Saved working directory and index state
"WIP on master: 016c048 Create index file".
HEAD is now at 016c048 Create index file
(To restore them type "git stash apply")
Following this, you can use the previously introduced git status command to see that your current working directory is cleaned up:
# On branch master
nothing to commit, working directory clean
The last saved stash always has the smallest room on the list, as if you were always adding another package to a stack. With the following command you can look at all cached stashes:
git stash listOutput:
stash@{0}: WIP on master: 016c048 Create file
stash@{1}: WIP on master: a1370d1 Revert
stash@{2}: WIP on master: 1cd6015 Change numbers
With the parameter pop, you can always restore the last saved stash. What is meant is that with the command
git stash popstash@{0} is restored first, followed by stash@{1} and then stash@{2}.
You also have the option of using the already introduced command git diff to compare the current stash with what is in your current working directory. With the stash command and the previously introduced commands, you have creative ways to jump between versions and changes without having to worry about losing recent changes.
Git revert - Undo changes (Other way)
Here I would like to introduce a command that also reverts changes, but in a slightly different way. Here, a new commit is created that reverts the corresponding changes. You have the option of changing a commit afterwards, as described above. This was done, for example, with the command git commit –amend, but this only worked as long as the repository was local. Here Git offers you the option of making a new commit that undoes all the changes made to an existing one.
git revert [Commit Hash]Instead of removing the commit from the project history, it determines how to reverse changes caused by the commit. A new commit is then added with the corresponding reversed content. This prevents Git’s history from being truncated, which is important for the integrity of your commit history and for reliable collaboration.
When the command is executed, a commit is created as described, which must also contain a corresponding commit message. In this particular case, this commit message is generated automatically. This makes sense in so far as it may not even be marked in the repository history that this is a revert.
You should use this undo command when you want to reverse a commit from your project history. This can be useful, for example, if it turns out that a bug was introduced into the project by a very specific commit. Instead of manually navigating to the code in question, fixing it and committing a new snapshot, you can use git revert to do the whole process automatically.
A revert has two important advantages over a reset. First, the project history remains unaffected: The process has no effect on commits that have already been published in a shared repository. Second, you can apply git revert to individual commits at any point in the history. git reset, on the other hand, only works retroactively from the current commit.
The advantage of using revert is that a new commit is created to undo certain changes. This way, no commits are deleted from the commit history or orphaned. git revert is the safer option compared to git reset in terms of losing code.
Git blame
With this command you can display changes to a file. It shows line by line in which commit it was last changed.
git blame [filename]To make working in the terminal more comfortable and to keep an overview, you can also use the following command to highlight the same commits in colour:
git blame --colour-lines [filename]Example:
^32e5dca (Joe Blow    2021-07-04 09:38:59 +0200   1) #!/usr/bin/env python
^32e5dca (Joe Blow    2021-07-04 09:38:59 +0200   2)
f759623a (G. Raymond  2021-07-13 16:25:23 +0200   3)
f759623a (G. Raymond  2021-07-13 16:25:23 +0200   4)
^32e5dca (Joe Blow    2021-07-04 09:38:59 +0200   5) import secrets
^32e5dca (Joe Blow    2021-07-04 09:38:59 +0200   6) import string
^32e5dca (Joe Blow    2021-07-04 09:38:59 +0200   7) import time
^32e5dca (Joe Blow    2021-07-04 09:38:59 +0200   8) import numpy
^32e5dca (Joe Blow    2021-07-04 09:38:59 +0200   9) from pyfiglet import Figlet
^32e5dca (Joe Blow    2021-07-04 09:38:59 +0200  10) import argparse
^32e5dca (Joe Blow    2021-07-04 09:38:59 +0200  11) import sys
^32e5dca (Joe Blow    2021-07-04 09:38:59 +0200  12)
^32e5dca (Joe Blow    2021-07-04 09:38:59 +0200  13) #start = time.time()
^32e5dca (Joe Blow    2021-07-04 09:38:59 +0200  14)
f759623a (G. Raymond  2021-07-13 16:25:23 +0200  15)
f759623a (G. Raymond  2021-07-13 16:25:23 +0200  16)
^32e5dca (Joe Blow    2021-07-04 09:38:59 +0200  17) chars_full = string.digits + string.ascii_letters + string.punctuation
^32e5dca (Joe Blow    2021-07-04 09:38:59 +0200  18) chars_digits = string.digits
^32e5dca (Joe Blow    2021-07-04 09:38:59 +0200  19) chars_ascii = string.ascii_letters
^32e5dca (Joe Blow    2021-07-04 09:38:59 +0200  20) chars_punctuation = string.punctuation
^32e5dca (Joe Blow    2021-07-04 09:38:59 +0200  21) chars_ascii_digits = string.ascii_letters + string.digits
^32e5dca (Joe Blow    2021-07-04 09:38:59 +0200  22) chars_ascii_punctuation = string.ascii_letters + string.punctuation
^32e5dca (Joe Blow    2021-07-04 09:38:59 +0200  23) chars_digits_punctuation = string.digits + string.punctuation
^32e5dca (Joe Blow    2021-07-04 09:38:59 +0200  24)
0d3407f3 (John Smith  2021-07-13 16:28:53 +0200  25)
0d3407f3 (John Smith  2021-07-13 16:28:53 +0200  26)
This can be helpful when working with several people and you want to make sure that if there is a bug, for example, that you write to the right person about it.
For more detailed handling of the git blame command, use the following command in the terminal:
git blame --help.gitignore-Data
With the so-called gitignore you can have files ignored. The file .gitignore contains a list of paths that are ignored by git. Here, changes to this data will have no effect on the commands git diff, git add, etc.
Important: The .gitignore file should always be committed so that certain files, folders, etc. are not included in the shared repository in the first place. This can also be very important when working together in a larger team.
Create a file called .gitignore inside your working directory as follows:
nano .gitignoreExample of the content of a .gitignore file:
# Byte-compiled / optimized / DLL files
__pycache__/
*.py[cod]
*$py.class

# C extensions
*.so

# Distribution / packaging
.Python
build/
develop-eggs/
dist/
downloads/
eggs/
.eggs/
lib/
lib64/
parts/
sdist/
var/
wheels/
share/python-wheels/
*.egg-info/
.installed.cfg
*.egg
MANIFEST

# PyInstaller
#  Usually these files are written by a python script from a template
#  before PyInstaller builds the exe, so as to inject date/other infos into it.
*.manifest
*.spec

# Installer logs
pip-log.txt
pip-delete-this-directory.txt

# Unit test / coverage reports
htmlcov/
.tox/
.nox/
.coverage
.coverage.*
.cache
nosetests.xml
coverage.xml
*.cover
*.py,cover
.hypothesis/
.pytest_cache/
cover/

# Translations
*.mo
*.pot

# Django stuff:
*.log
local_settings.py
db.sqlite3
db.sqlite3-journal

# Flask stuff:
instance/
.webassets-cache

# Scrapy stuff:
.scrapy

# Sphinx documentation
docs/_build/

# PyBuilder
.pybuilder/
target/

# Jupyter Notebook
.ipynb_checkpoints

# IPython
profile_default/
ipython_config.py

# pyenv
#   For a library or package, you might want to ignore these files since the code is
#   intended to run in multiple environments; otherwise, check them in:
# .python-version

# pipenv
#   According to pypa/pipenv#598, it is recommended to include Pipfile.lock in version control.
#   However, in case of collaboration, if having platform-specific dependencies or dependencies
#   having no cross-platform support, pipenv may install dependencies that don't work, or not
#   install all needed dependencies.
#Pipfile.lock

# poetry
#   Similar to Pipfile.lock, it is generally recommended to include poetry.lock in version control.
#   This is especially recommended for binary packages to ensure reproducibility, and is more
#   commonly ignored for libraries.
#   https://python-poetry.org/docs/basic-usage/#commit-your-poetrylock-file-to-version-control
#poetry.lock

# PEP 582; used by e.g. github.com/David-OConnor/pyflow
__pypackages__/

# Celery stuff
celerybeat-schedule
celerybeat.pid

# SageMath parsed files
*.sage.py

# Environments
.env
.venv
env/
venv/
ENV/
env.bak/
venv.bak/

# Spyder project settings
.spyderproject
.spyproject

# Rope project settings
.ropeproject

# mkdocs documentation
/site

# mypy
.mypy_cache/
.dmypy.json
dmypy.json

# Pyre type checker
.pyre/

# pytype static type analyzer
.pytype/

# Cython debug symbols
cython_debug/

# PyCharm
#  JetBrains specific template is maintainted in a separate JetBrains.gitignore that can
#  be found at https://github.com/github/gitignore/blob/main/Global/JetBrains.gitignore
#  and can be added to the global gitignore or merged into this file.  For a more nuclear
#  option (not recommended) you can uncomment the following to ignore the entire idea folder.
#.idea/
This is an example from the repository directly from Github. There are some concrete examples for all common programming languages that can be used freely. For research or direct use, you can find the corresponding .gitignore files gitignore.
References
[1] Git - Chacon, S., Straub, B., et al. (2023). “Git Documentation: A Comprehensive Guide for Version Control.” Git Community. https://git-scm.com/doc
[2] GitHub - GitHub, Inc. (2023). “GitHub: A Platform for Version Control and Collaboration.” GitHub.
[3] gitignore - Repository on GitHub - GitHub, Inc. (2023). “Collection of useful .gitignore templates.” GitHub. https://github.com/github/gitignore
[4] TikZ - Tantau, T. (2013). Graph Drawing in TikZ. In: Didimo, W., Patrignani, M. (eds) Graph Drawing. GD 2012. Lecture Notes in Computer Science, vol 7704. Springer, Berlin, Heidelberg. https://doi.org/10.1007/978-3-642-36763-2_46
License
CC BY-NC-SA 4.0 Licence
With this licence, you may use, modify and share the work as long as you credit the original author. However, you may not use it for commercial purposes, i.e. you may not make money from it. And if you make changes and share the new work, it must be shared under the same conditions.